Wednesday, June 25, 2014

Marshmallow Crossbows


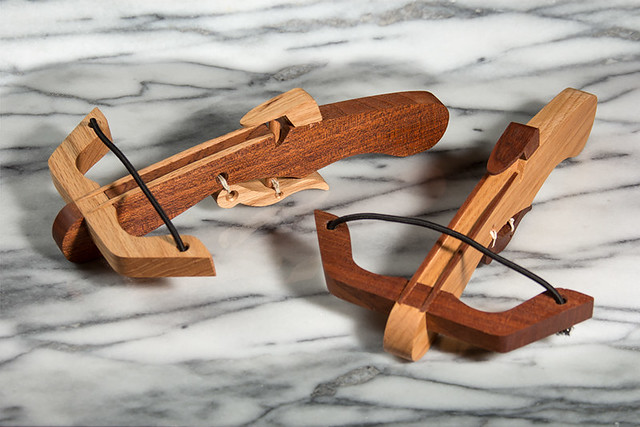
I completed the "marshmallow crossbows." I got the idea (as well as the plans) from Steve Ramsey, and these were actually pretty fun to build. Most of my woodworking isn't done at this scale, so I used the project as an opportunity to develop my skills with hand tools. I cheated a bit on a few parts, but I used a coping saw, chisels, a file, and sandpaper wherever possible. Technically I believe these are slingshots because the power comes from the elasticity of the cord rather than the flex of the bow, but the name is really more of a reference to the shape. Plus, they're toys so it doesn't really matter anyway.

Saturday, June 21, 2014

Making Dowels

I've been practicing my hand tool skills over the past week. For a fun project, I decided to build a couple of 'marshmallow crossbows' that Steve Ramsey featured on his YouTube channel. I have a lot of wood left over from various projects, so I decided to make two complementary crossbows - one for me and one for my daughter. Instead of shooting marshmallows around the house, I'm going to use small foam plugs cut from dense pipe insulation. The crossbows look to be the perfect size for Nerf darts, so I might pick up a pack of those as well to see how they work. Since this is a project that I'm doing for fun, I thought it would be a good opportunity to work on my hand tool skills. I did use the band saw and the combination belt/disc sander a bit, but most of the cutting and shaping has been done with a coping saw and chisels. For this post, I wanted to document my effort to make dowels.

Tuesday, June 17, 2014

Table Saw Cabinet Complete

I finally completed the table saw cabinet. It took a bit longer than I anticipated because real life circumstances dictate that some of my woodworking has to wait until the weekend. Still, after a small delay I completed the cabinet. I still have a bit of future work to do; I plan to build a small drawer which will sit above the blade caddy, a door to cover the blade caddy area, and possibly a couple of doors for the cabinet. I also will eventually add a couple of hooks on one side to hold the folding outfeed holder. However, those will wait for another day because I have some other, better projects in mind.

Tuesday, June 10, 2014

Blade Caddy Progress

I've been making some progress on the blade caddy. When I left off, the core pieces were cut to size and I had made the dados and rabbets. Rather than letting it float, the center shelf is held in place with a simple mortise and tenon joint. I designed the center shelf this way so that the shelf could double at the top of the blade caddy, as well as finishing off the small box in which I plan to place a drawer. I decided the best way to cut the mortises was to use my router and a 3/4 inch straight cutting bit for the right hand side, and a 3/8 straight cutting bit for the left side. The left side is only half thickness because it also forms the rabbet for left side of the blade caddy. The mortise and tenon joints are 3/8 deep, and setting the proper depth on my router is easy with my cutting depth gauges.

Saturday, June 7, 2014

Table Saw Cabinet With Blade Caddy

My current table saw setup is less than efficient, so it's time to update it to provide additional storage and better access to all the accessories. This is a project that I've been meaning to do for a while, and I'm finally getting to it. Right now I'm using an old fiber board book shelf (the super cheap kind you find at big-box stores) to store table saw blades and miscellaneous things. We used it in our first apartment so many years ago, but after we bought our first house and acquired real furniture it found a home in the garage. You can see how crowded and poorly placed it is in the following image:

Fast forward to today. I want to build a dedicated cabinet to store all of my table saw blades, table inserts, arbor wrenches, and any other accessory that fits. The primary function of the cabinet is to serve as a place to store blades, so the design will be built around that. This is an old problem, so I started by looking around the web to see what other people have come up with. Why reinvent the wheel, right?

Sunday, June 1, 2014

I think I'm ready

As promised, I'm beginning my blog with an older project, but one that has some significance for me.  It was one of the first involved projects that I took on without any mentoring from my father, from who I learned almost everything I know about woodworking.  It was also significant in the message it delivered to my wife.  This first post is a bit long and probably has more personal information than future projects, but it's one of the more meaningful projects I've built.  The back story necessarily comes with it.  With the exception of some older projects that I didn't fully document, future posts will lean more toward actual woodworking.